Tuesday, February 14, 2012

Sweets for Your Sweetie!

How to make Chocolate Dipped Strawberries ~

Materials needed:
fresh strawberries, paper towels, a colander, Candy Quick or Almond Bark in white and chocolate (you can also use white and brown chocolate chips, candy papers or cupcake papers, tooth picks or a very fine paint brush, Crisco, tupperware bowls, paper plates, wax or parchment paper, and a container to put your finished berries in.

Step #1 - Start with chilled berries. Wash and drain your strawberries in a colander and lay them out on paper towels to dry. I always go back and hand dry each strawberry with paper towels - making sure to check the stems and leaves for dirt, etc.

Step #2 - Heat your chocolates in the microwave for a minute at a time until they melt to the desired constistency. I prefer Almond Bark over chocolate chips because it melts quickly and easily without lumps. If you are using chocolate chips then you will need to add a tsp. or so of Crisco until you get the chips completely melted and to the desired thin consistency. (Note: I prefer to melt my chocolate in tupperware because then I can just throw it away when I'm done...or save what is left by covering it.)

Step #3 - Seperate out some of your papers (either candy papers or cupcake papers) so that you will be able to move quickly once you start dipping. Place a piece of wax paper or parchment paper on your work table - this is to place your dipped strawberries on as the chocolate "sets".

Making Black and White Drizzled Strawberries 

Step #1 - Dip a strawberry in chocolate about 1/2 - 3/4 of the way.


Step #2 - Holding the dipped strawberry over a paper plate, drizzle the thin white chocolate back and forth until your berry looks similar to this. You can also make swirls with the white chocolate!


Step #3 - You can either let the chocolate on your chilled berries "set"on wax/parchment paper before placing them into the papers OR you can place them immediately into the papers after dipping. The papers make it easy to pick up a strawberry and eat it - especially if serving them at a party or event.

NOTE: If you use chocolate chips instead of Almond Bark or Candy Quick - you will need to place your dipped strawberries into a refrigerator for a few minutes (maybe 2-4 min.) to help the "setting process". Otherwise the chocolate from the chips will not get firm.
FYI: Almond Bark and Candy Quick are normally found on the baking aisle of a grocery store next to the chocolate chips.


Making Tuxedo Strawberries 

Step #1 - Dip your strawberry in white chocolate and let it "set" or become hardened.


Step #2 - Once the white chocolate is hard - dip the same strawberry in the darker chocolate - tilting it to one side.

Now to the other side....


This forms the"vest" or "jacket"  of your tuxedo!

Step #3 - Place your strawberry into your paper so that the chocolate can completely harden.
For really large strawberries (like this one) it is best to use the cupcake size paper.


Step #4 - Now it's time to add the buttons... ( I normally use a toothpick or a very fine point paint brush) and dip it into the chocolate barely touching the strawberry.


Step #5 - Almost done!! Now it's time to add the bow-tie. (This is basically two triangles touching in the middle.)


Now the other side...


Lookin' Good!!

Important Information:
Chocolate Dipped Strawberries normally sell for approx. $1.50-$3.50 each.
(especially for the Tuxedo style!) They make a great dessert or garnish on a cake.
Once dipped they normally are only good for a day or so. When they heat up to room temperature - the chocolate separates from the berry so...
you will want to dip them at the last minute possible to ensure freshness.

With these simple steps ...you can dip your own berries for a fraction of the cost - while giving a "very rich" gift!

Here's an example of how I  package my chocolate dipped strawberries.
Other ideas would be on a platter, in a box, or a basket.


Have fun dipping and Happy Valentine's Day!!

Blessings!
Brandy


Wednesday, February 8, 2012

Bow making 101

Bow Making Tips ~

Step #1 - Supplies needed:
ribbon (at least 3-5 yards), scissors, and pipe cleaners or wire

Step #2 - Hold several inches of the end of your ribbon between your thumb and fingers.
Twist once.


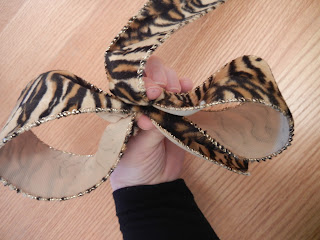
Step # 3 - Make a loop with ribbon (about 3-4 inches long depending on how wide your ribbon is) and then twist once. Do this on the other side as well. Then twist once. Keep going back and forth adding a loop and then twisting once each time. Keep this held together tightly between your thumb and fingers.
Note: For demonstration purposes I used wide/one-sided ribbon and added 3 loops to each side of my bow.


So...you'll loop then twist...


Loop then twist...


Back and forth...several times..


I did 3 loops on each side....


Step # 4 - Once your loops are made you may want to add tails or streamers that hang down from your bow. To do this you make 1 large loop and twist.


Step # 5 - Run a pipe cleaner or wire through the center of where you are tightly holding all of the twists together and then pull the sides of the pipe cleaner down towards the big loop (tails). Twist as TIGHTLY as possible! You may even want to tighten with wire cutters to make sure all of the ribbon is secure and won't slip out of the grip of the wire. If it does ...your bow will fall apart.


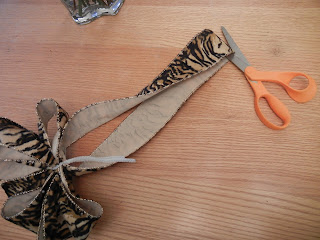
Step # 6 - Pull down on the tails/streamers and cut in half.
Then fold the ribbon in half to cut the decorative points in the ends.


Cut in half....


Then fold and cut again...


Step # 7 - Pull, straighten, and fluff the loops of your bow.
Pull the tails/streamers to the center of the bow.
You are Done!!


Here is our long stemmed rose arrangement from the last post ....finished off with our beautiful bow. Very nice!


How to arrange long stemmed roses...

How to arrange long stemmed roses in a vase!

Step #1 - Your supplies/tools:
12 roses, greenery (leather leaf),and a filler flower (I like either waxflower or baby's breath)
a pair of scissors, a pair of stem cutters, and a vase


Step #2 - Place about 6 or 7 of your roses into the vase (already filled with water).
Make sure to cut the stems to the length you desire. These roses should all pretty much be the same height.

Step #3 - Add your greenery.


Step #4 - Add the rest of your roses.These need to be taller since they will be placed in the center of the arrangement. You will be able to judge the proper height needed as you place each remaining flower.


Step #5 - Make sure to clean the stems of your roses and filler flowers. You do this by pulling off all of the small branches, leaves and tiny flowers that would be below the water line of your vase. This keeps your flower arrangement fresher longer. You can also add Sprite or an asprin to the water and it will extend the life of the flowers as well!


Step #6 - Add your filler flowers (waxflower shown here) in between the roses. This gives your arrangement a nice, full look!!


In the next post I will show how to add a bow to your arrangement!


And the winners are..

Drum Roll Please...

Today is the day!!! Woo-Hoo!!

The winners of our "Perfect Date Idea" comment contest are:

The Necklace Set - Angie

The Spa Care Package - Jennifer

Please contact me and I will get your prize to you ASAP!
Thanks so much for your "Perfect Date" ideas ladies!

Blessings!
Brandy


Saturday, February 4, 2012

 "Mr. Sweet-n-Low"...
(My husband Andrew was given this cute "nick-name" by some of my students at school.
They always heard me talking about how sweet Mr. Low was - so one day without warning they all began to greet him as Mr. Sweet-n-Low and it stuck! )

I thought I would share several of the sweet things he has done for me throughout our almost 12 amazing years together.
Maybe these will inspire...

* One time (before we married) I went on a trip to Arkansas with my mom for a friend's wedding. Mom and I stayed at a beautiful Bed and Breakfast and even though I was looking forward to our time there...I was heart sick to be away from Andrew.
Once we arrived at the beautiful "Crescent Cottage" in Eureka Springs (http://www.1881crescentcottageinn.com/) and were shown to our room, the inn keeper came to me privately and handed me a handwritten letter. She said, "This arrived for you in the mail yesterday."
Much to my amazement, Andrew had sent a beautiful handwritten love letter, expressing his feelings for me and how much he would miss me while I was away. Wow! Need I say more? It was amazingly thoughtful and romantic.

* Another time he secretly packed a bag for us  and without a clue....took me on what I thought was a "day trip" but ended up to be a romantic stay at The Shiloh Morning Inn Bed and Breakfast in Ardmore, Oklahoma! This place is INCREDIBLE!! My ALL-TIME Favorite Place!
Check them out: http://www.shilohmorning.com/

* Sometimes Andrew will search out a brand new restaurant that neither one of us has been to and take me there on a "secret date".
I guess the fact that he has taken the time to research things on his own AND keep it a secret from me keeps me very intrigued AND very flattered!

Here's one of our most recent dinner date locations.
It was phenomenal!

"Via Real" - http://www.viareal.com/